In a previous post I described how I migrated this static website from Github Pages to Amazon AWS using services like S3, CloudFront, Route 53 and Amazon Certificate Manager.
Though the technical result is quite satisfying in terms of features and security, espcially from the view of a visitor. The workflow of updating the website is quite annoying as I have to upload new website content manually to the S3 bucket using the upload feature of the S3 Console.
In this post I describe how I improved the management workflow of this website.
Overview
- Setup an IAM identity to provide API access to only the required AWS resources based on least privilege principle.
- Install and configure Amazon AWS CLI tools.
- Create shortcuts for often used commands using make.
Create an IAM identity
Log in to the Amazon AWS Console and select IAM from the Services dropdown, the IAM landing page looks something like this:

We now need to setup a policy, a group and a user, let’s go!
Policy
- So we first need to design our least privilege based policy. For this use-case I’ve decided to grant only the required bucket permissions for the standard Create, Read, Update and Delete (CRUD) operations instead of e.g. full bucket access. Besides the limited set of permissions I’ve decided to also implement an IP based access restriction condition, just in case my access credentials get stolen or are leaked by accident. So make sure to replace the “x.x.x.x” with your actual IP address or subnet (CIDR notation), if you don’t want IP based access restrictions then delete the entire “Condition: { … }” code block.
{
    "Version": "2012-10-17",
    "Statement": [
        {
            "Sid": "1",
            "Effect": "Allow",
            "Action": [
                "s3:PutObject",
                "s3:GetObject",
                "s3:ListBucket",
                "s3:DeleteObject"
            ],
            "Resource": [
                "arn:aws:s3:::newblogdomain.com",
                "arn:aws:s3:::newblogdomain.com/*"
            ],
            "Condition": {
                "IpAddress": {
                    "aws:SourceIp": "x.x.x.x"
                }
            }
        }
    ]
}-
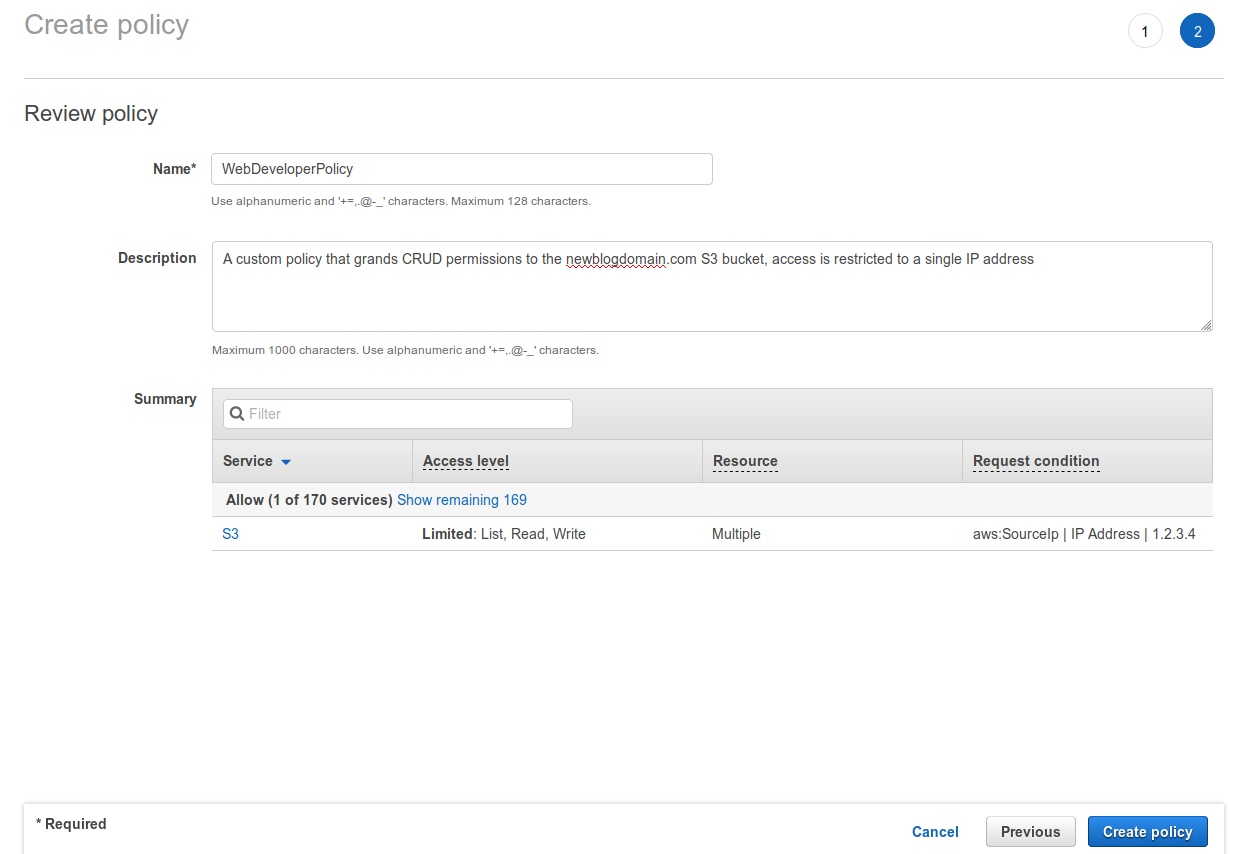
From the IAM landing page click on Policies in the navigation pane, you’ll now see a pretty extensive list of Amazon managed policies. For our specific use-case we’re going to create a custom policy so hit the Create policy button to start the policy creation wizard. The wizard defaults to the Visual editor which is normally fine, but in this case switch to the JSON tab and paste the JSON code in there. When done hit the Review policy button.
-
Now we need to provide a Name and Description for the policy, you should also review the Summary section and be sure it reflects what you’ve expected to achieve. When satisfied hit the Create policy to create the policy. The wizard will then return you to the policies overview.

Group
-
With a nice policy waiting to be used it’s time to create a group! Eventhough it’s possible to directly attach policies to users, using groups is considered best practice so let’s stick to that! Click on Groups in the navigation pane and then hit the Create New Group button.
-
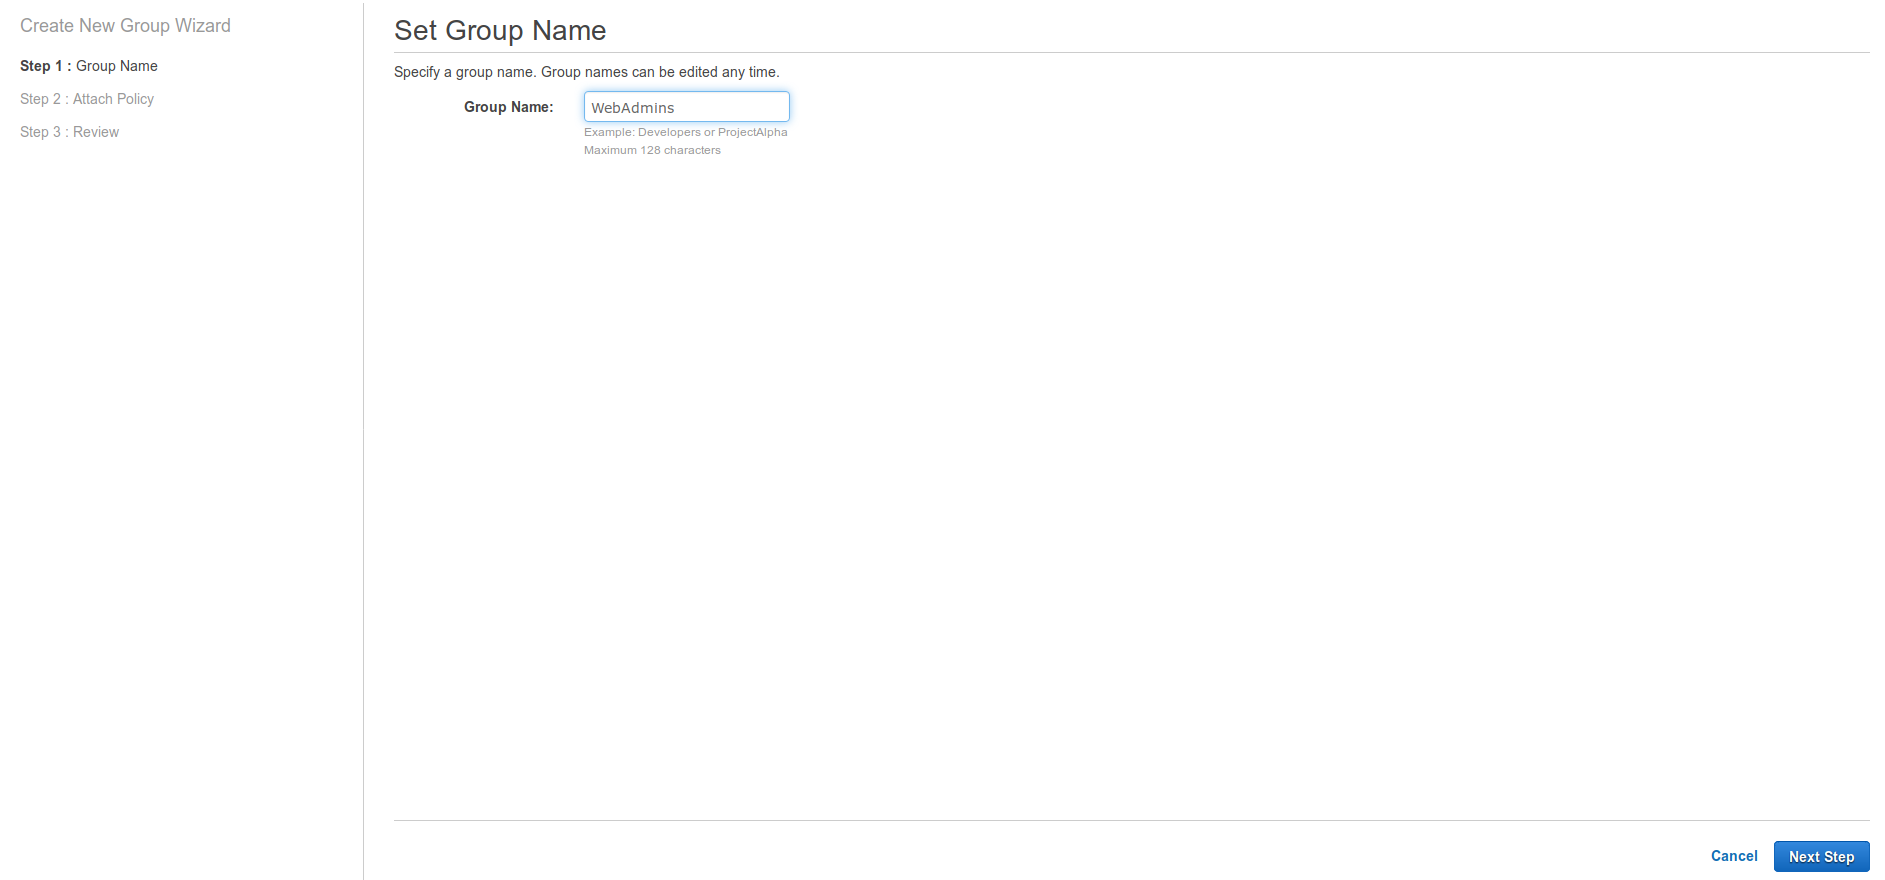
The first step of the wizard will ask for a Group Name, e.g. WebAdmins. Proceed to the Next Step.
-
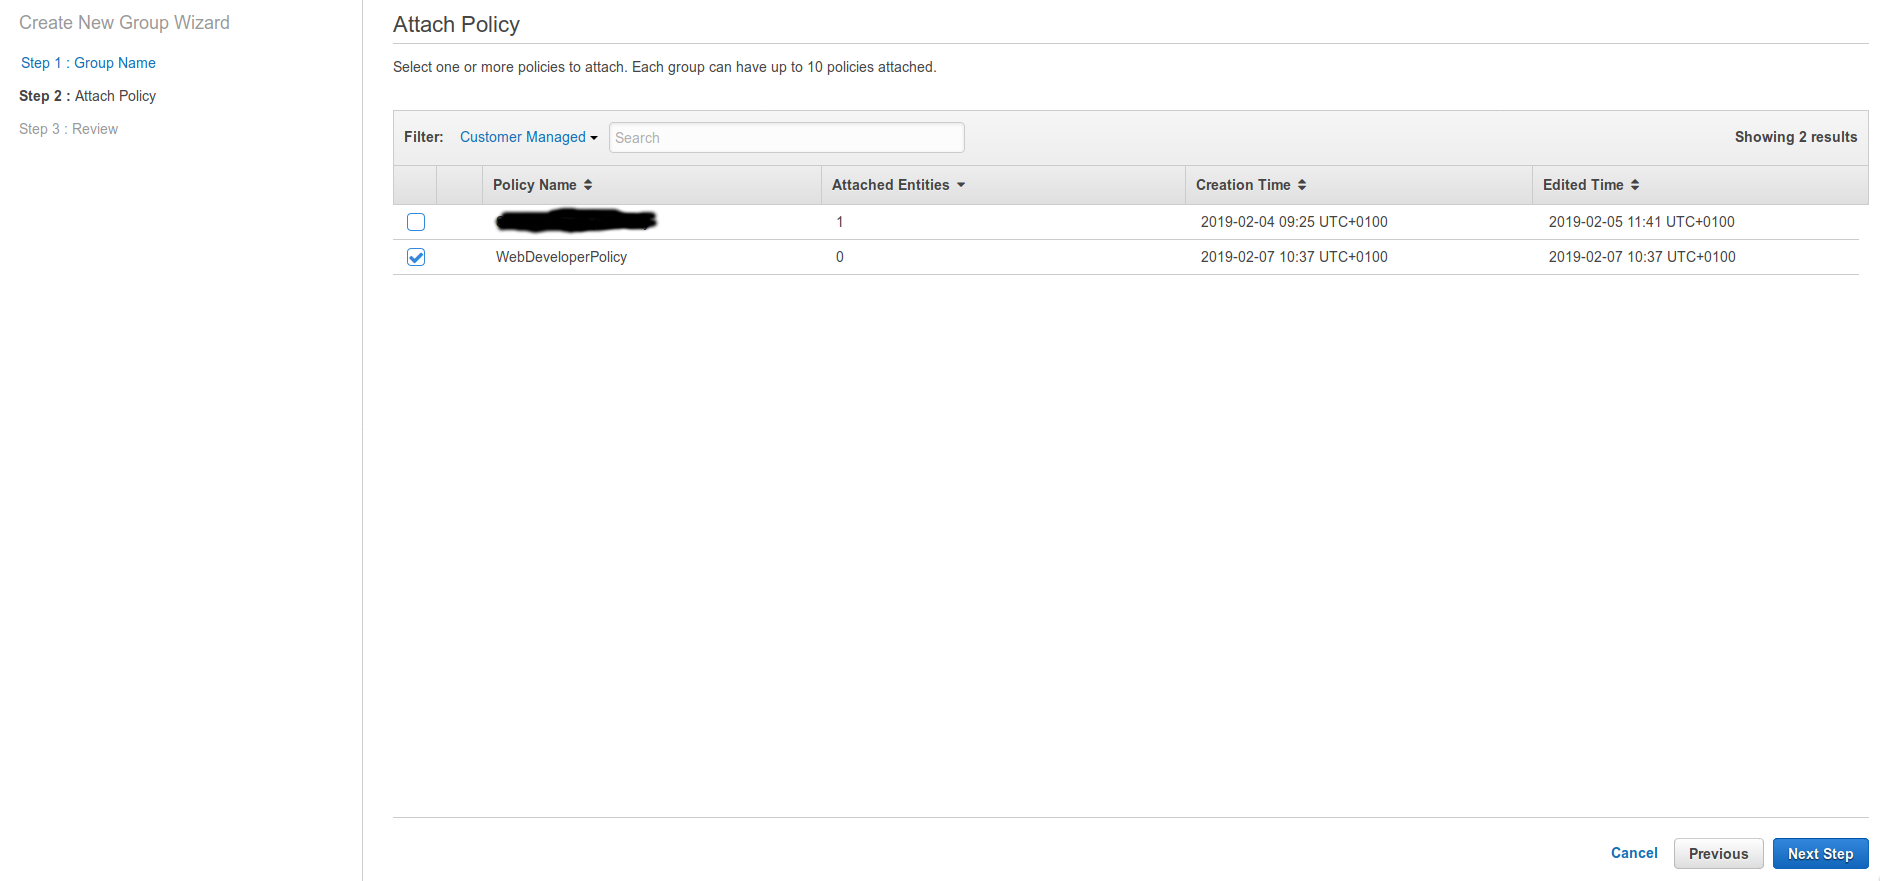
Now we need to attach our custom policy to this group. To make life easier set the Filter to Customer Managed and select the WebDeveloperPolicy. Then continue to the Next Step.
-
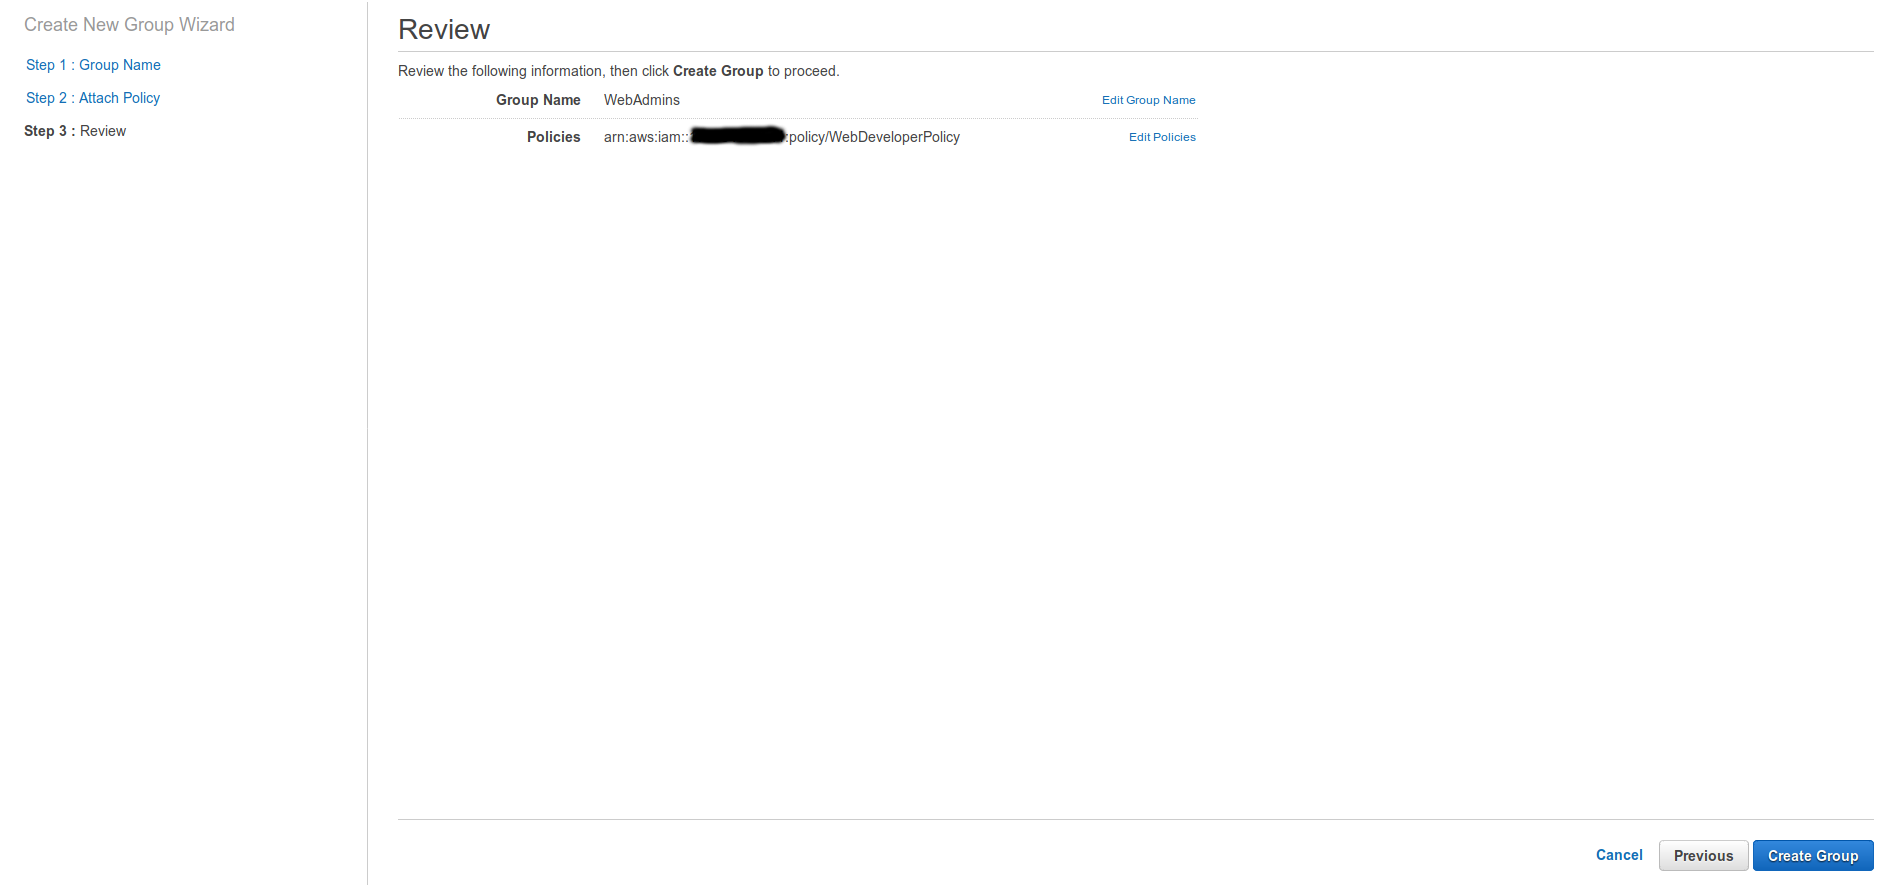
Review your group settings and when satisfied click the Create Group button. The wizard will then return you to the groups overview.
User
-
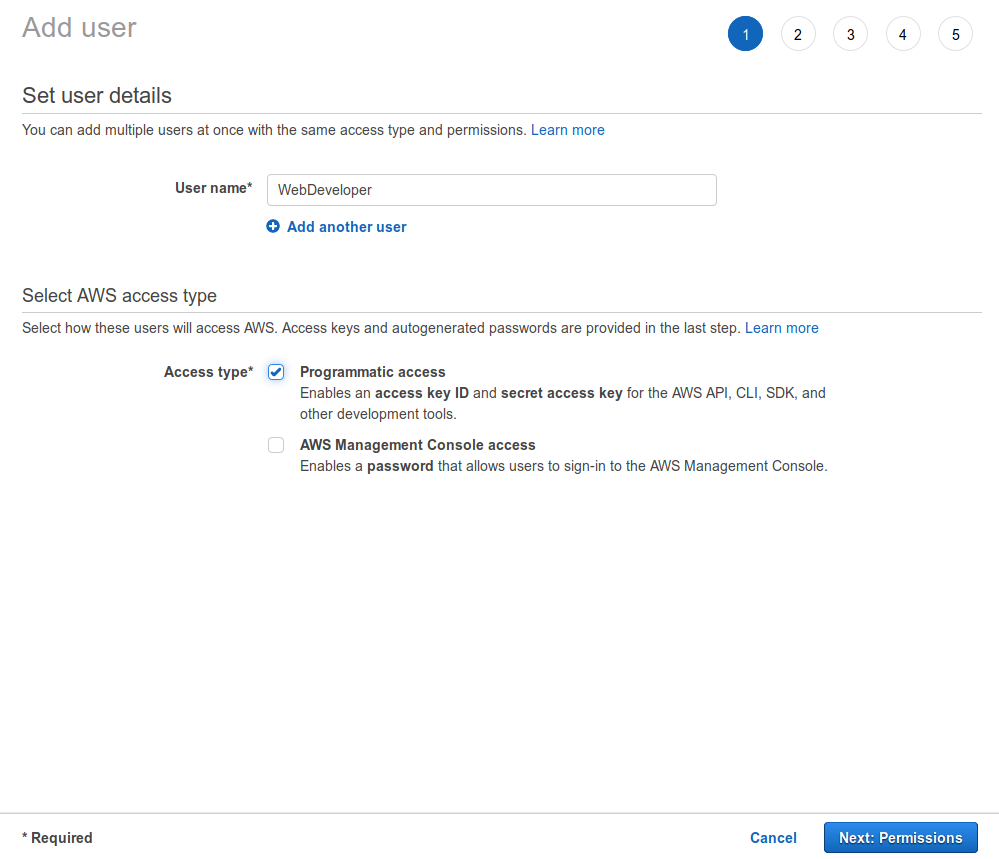
Click on Users in the navigation pan and then hit the Add user button.
-
Enter a meaningful User name and only select Programmatic access in the Acces Type section. We’re only using this user to push out website updates to S3 so it makes perfect sense to not enable Console access for this account. Click Next to setup the permissions for this account.
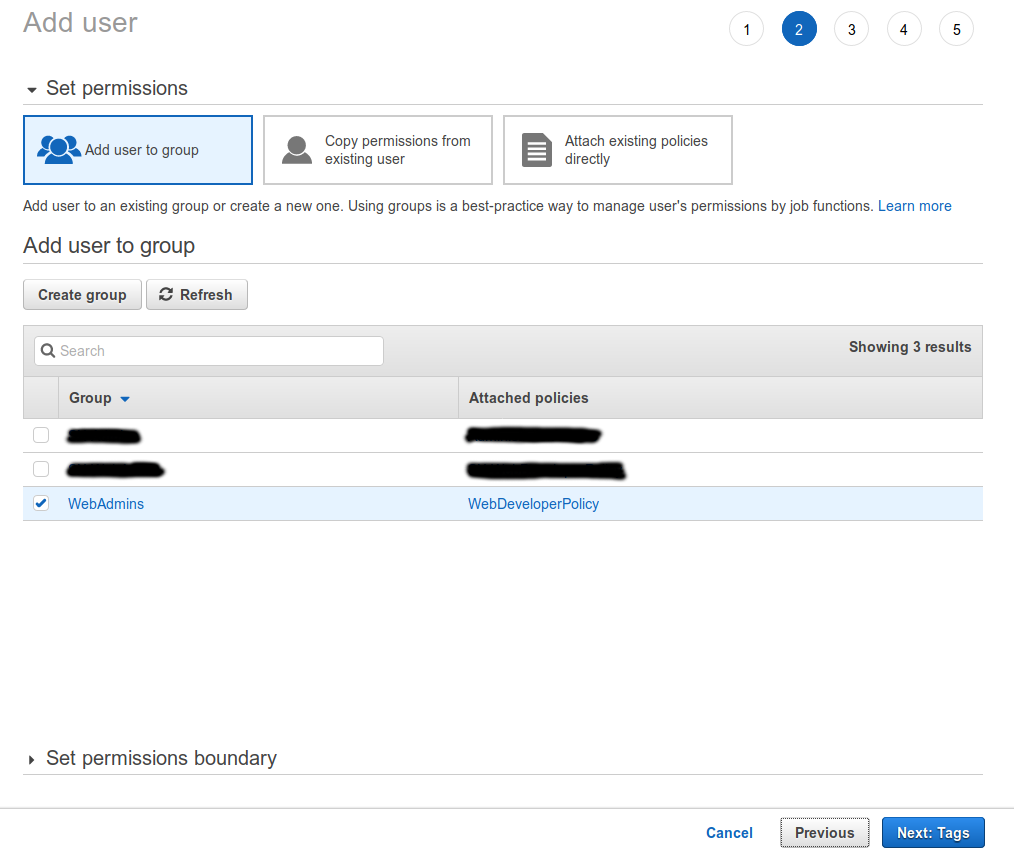
-
We’ve already setup a custom policy and attached that to our group. Now we only need to add our new user to our group. Then click Next to setup Tags (optional).
-
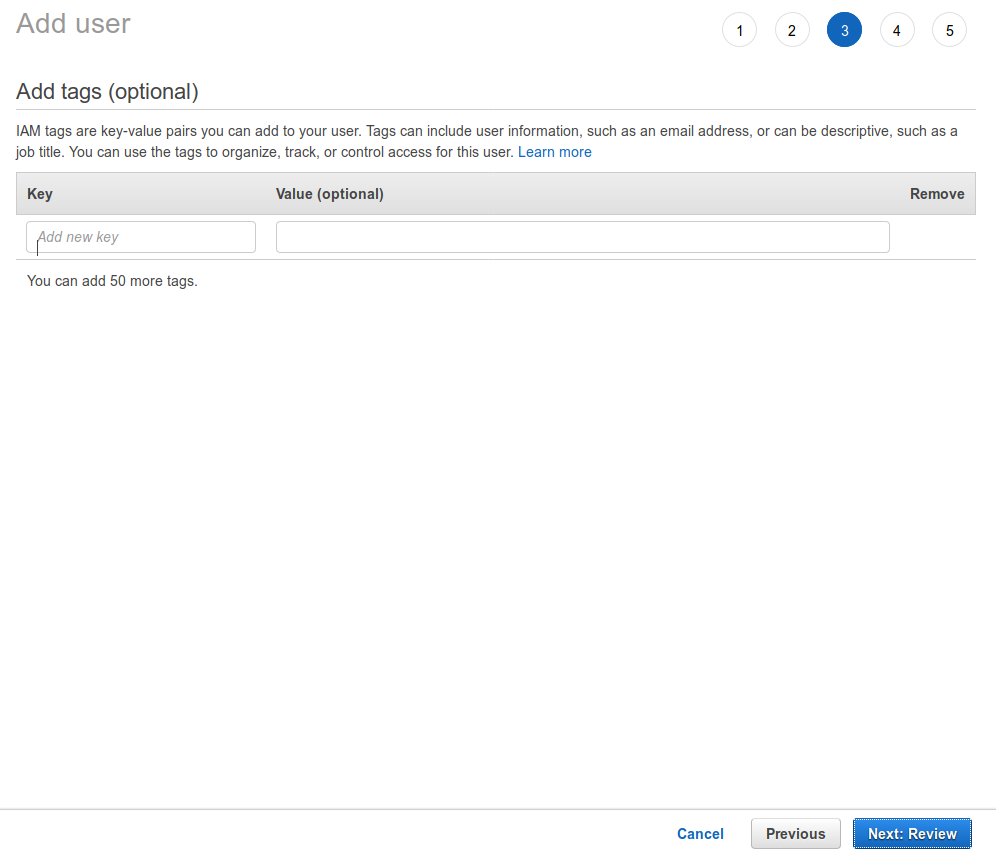
It’s best practice to use tags everywhere in AWS, but in this example I don’t bother with it. Hit the Next button to review the new account.
-
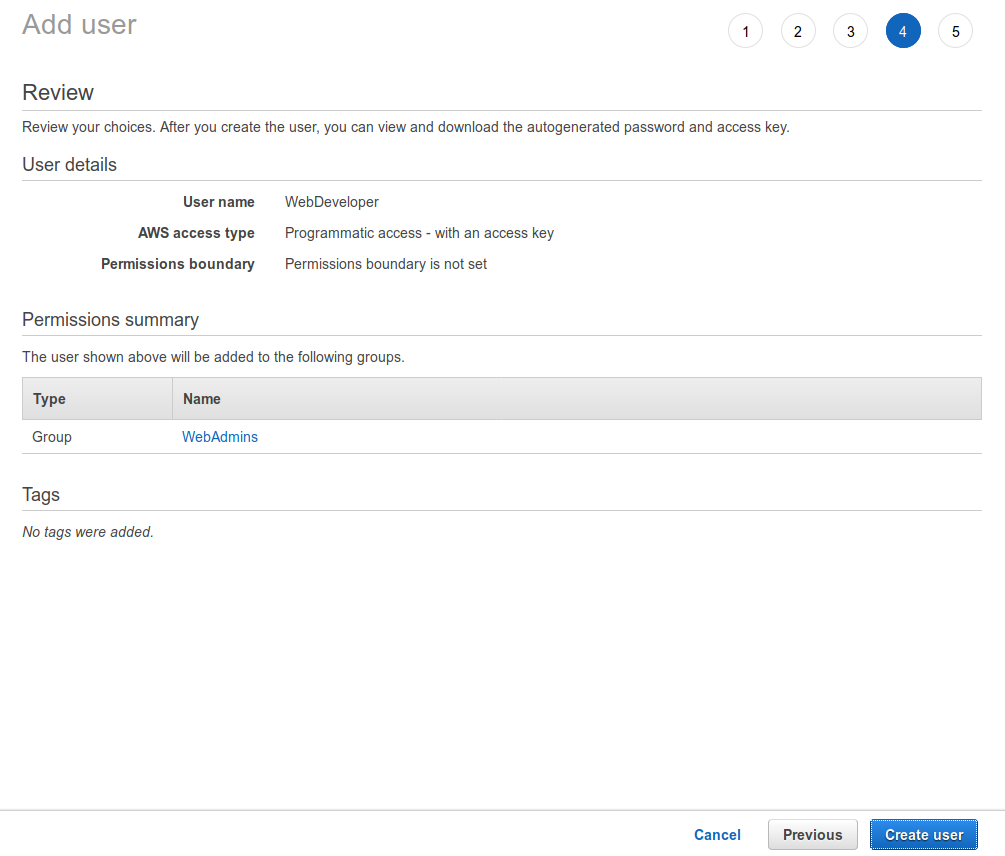
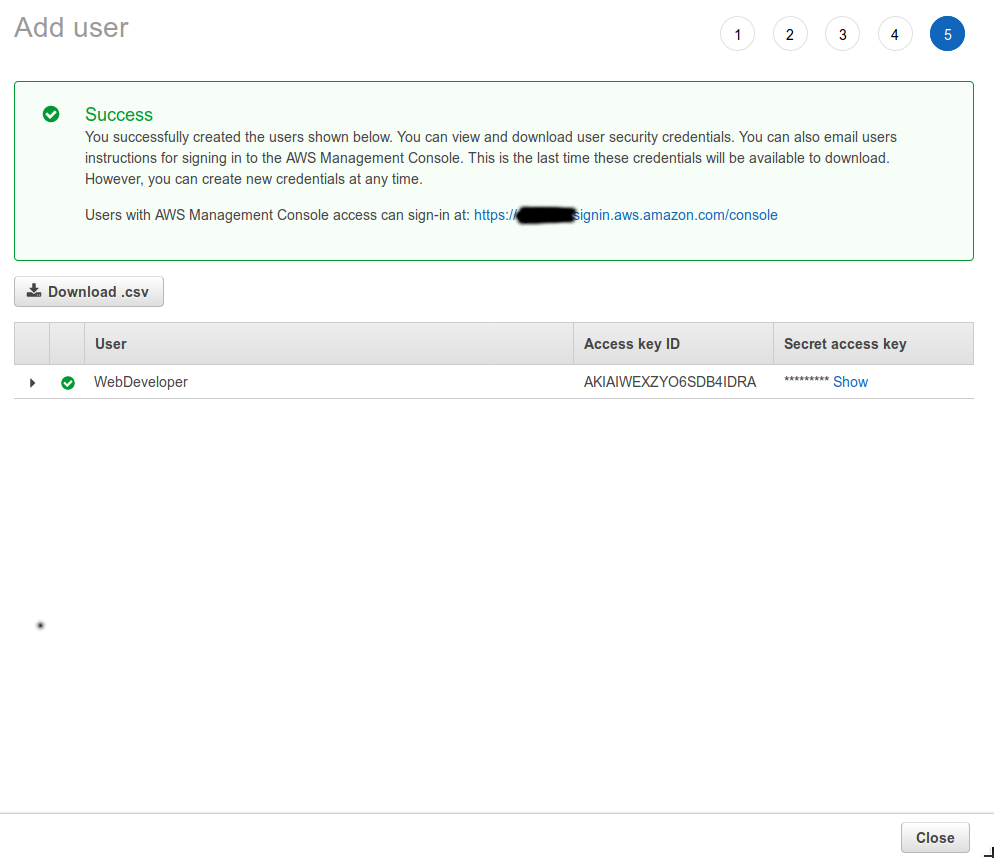
Review your account and when everything seems good to go; hit Create user.
-
The account has been created, now you need to get the Access Key ID and Secret access key for this account by clicking the Download .csv button. Note: You only get this option once, so do it now! If you loose access to these credentials you need to create new credentials!
Install and configure CLI tools
We now have an AWS identity and appropiate access rights to be able to manage our S3 bucket, awesome! Next we need to setup our client side tooling; the AWS CLI package.
- I use Ubuntu on the desktop so this process is really easy! You just need to install a package from the standard repositories, so drop to a shell and apt-get it! If you’re on Windows or Mac, WHY!!?!? Well, could be for many valid reasons but I’m still not going to bother with it. Check out the AWS CLI website for help with the installation process.
jorgen@mainframe:~$ sudo apt-get install awscli -y
<snip>
jorgen@mainframe:~$- Now we need to setup our Access Key ID and Secret Access Key which we downloaded as a CSV earlier, the file is called credentials.csv and should be somewhere in your Downloads directory. Drop to a shell to start the configuration! The access & secret key field are required the region and output format are optional, I find it convenient to provide a default region as it saves typing later on.
jorgen@mainframe:~$ aws configure
AWS Access Key ID [None]: XXXXXXXXXXXXXXXX
AWS Secret Access Key [None]: YYYYYYYYYYYYYYYYYYYYYYYYYYYY
Default region name [None]: eu-west-1
Default output format [None]:
jorgen@mainframe:~$ - This configuration process has created an AWS configuration directory which contains two configuration files, the hidden directory is created in the root of your home directory ($HOME) and is named .aws.
jorgen@mainframe:/tmp$ cd ~
jorgen@mainframe:~$ tree .aws
.aws
├── config
└── credentials

0 directories, 2 files
jorgen@mainframe:~$ - Checkout the contents of these files so that you know what happened.
jorgen@mainframe:~$ cd .aws
jorgen@mainframe:~/.aws$ cat config
[default]
region = eu-west-1
jorgen@mainframe:~/.aws$ cat credentials
[default]
aws_access_key_id = XXXXXXXXXXXXXXXX
aws_secret_access_key = YYYYYYYYYYYYYYYYYYYYYYYYYYYY
jorgen@mainframe:~/.aws$ - We can now verify of the AWS CLI configuration and provisioned access rights via the IAM policy are actually working, let’s drop to a shell again! You should be able to list the contents of your S3 bucket, remember that we did not grant the access right to list all S3 buckets.
jorgen@mainframe:~$ aws s3 ls s3://newblogdomain.com
                           PRE blog/
                           PRE categories/
                           PRE css/
                           PRE img/
                           PRE js/
                           PRE media/
                           PRE page/
                           PRE tags/
2019-02-05 12:09:44       8844 404.html
2019-02-05 12:09:45      13203 index.html
2019-02-05 12:09:45       3318 index.xml
2019-02-05 12:09:46       1990 sitemap.xml
jorgen@mainframe:~$
Installing and configuring make
In this section we’ll setup some shortcuts for regular website management activities like deploying new content. We’ll do this using make, there are a lot of options available to achieve the same but I like to keep things simple!
- Most decent operating systems have make installed by default or allow it to be installed pretty easily, again on Ubuntu it’s only one apt-get away!
jorgen@mainframe:~$ sudo apt-get install make
<snip>
jorgen@mainframe:~$- Next we need to setup a simple Makefile that provides a simple starting place which we can later improve. For convenience I always place this file in the root directory for my project, my projects organization currently looks likes this.
jorgen@mainframe:~/Projects/newblogdomain.com$ ls -l
total 36
drwxr-xr-x  2 jorgen jorgen   98 jan 17 15:39 archetypes
-rw-r--r--  1 jorgen jorgen 1202 feb  6 11:17 config.toml
drwxr-xr-x  4 jorgen jorgen  282 feb  5 12:44 content
drwxr-xr-x  2 jorgen jorgen    6 jan 17 15:39 data
drwxr-xr-x  2 jorgen jorgen    6 jan 17 15:39 layouts
-rw-r--r--  1 jorgen jorgen  238 feb 19 13:22 Makefile
drwxr-xr-x 12 jorgen jorgen 4096 jan 17 15:39 public
-rw-r--r--  1 jorgen jorgen   68 jan 30 08:28 README.md
drwxr-xr-x  3 jorgen jorgen   98 jan 17 15:41 resources
drwxr-xr-x  2 jorgen jorgen    6 jan 17 15:39 static
drwxr-xr-x  3 jorgen jorgen   98 jan 17 15:40 themes
jorgen@mainframe:~/Projects/newblogdomain.com$ - For now I want the Makefile to support four simple actions: list, list recursively, build website, deploy website. You need to make adjustments for your S3 bucket name, the actual build command to use and the location of the files that are synced to S3. Pretty easy stuff, right?!
# Makefile for the newblogdomain.com website.
# Provides shortcuts for often used commands.

ls:
	@aws s3 ls s3://newblogdomain.com

lsr:
	@aws s3 ls s3://newblogdomain.com --recursive

build:
	@hugo

deploy:
	@aws s3 sync ./public/ s3://newblogdomain.com --delete --size-only
- Using this is as simple as pie, just make some changes and run make build and make deploy.
jorgen@mainframe:~/Projects/newblogdomain.com$ make build

                   | EN
+------------------+----+
  Pages            | 25
  Paginator pages  |  0
  Non-page files   | 40
  Static files     | 34
  Processed images |  0
  Aliases          |  8
  Sitemaps         |  1
  Cleaned          |  0

Total in 84 ms

jorgen@mainframe:~/Projects/newblogdomain.com$ make deploy
upload: <snip>
upload: <snip>
<snip>
jorgen@mainframe:~/Projects/newblogdomain.com$
That’s it for now. We can now build and push our website without using the AWS S3 console and we have limited the amount of typing involved :-). Also, we have achieved this by applying the least privilege security principle! In a future blog post we’ll take a look at other AWS services that we can leverage to improve on this even more!